
Are you tired of manually tracking your checking account transactions? Creating a checkbook register in Excel is an excellent way to monitor your finances, keep track of your spending, and ensure you never overdraw your account again. In this guide, I’ll walk you through the entire process of how to make checkbook register in Excel.
Why Use Excel for Your Checkbook Register?
Before we dive into the how-to, let’s talk about why Excel is perfect for managing your checking account:
- Automatic calculations: Excel does the math for you, eliminating errors in your balance
- Customizable design: Create a register that fits your specific needs
- Searchable entries: Quickly find transactions by date, amount, or payee
- Budget tracking: Add categories to analyze your spending habits
- Accessible anywhere: Save to the cloud and access from multiple devices
Using a digital checkbook register saves time, reduces errors, and gives you better insights into your spending patterns. Plus, you’ll never have to decipher your own handwriting again!
Basic Excel Checkbook Register: Step-by-Step Instructions
- Let’s start with the basics. Here’s how to create a simple yet effective checkbook register:
Step 1: Set Up Your Spreadsheet
- Open Microsoft Excel and create a new blank workbook
- Save your file with a descriptive name like “My Checkbook Register”
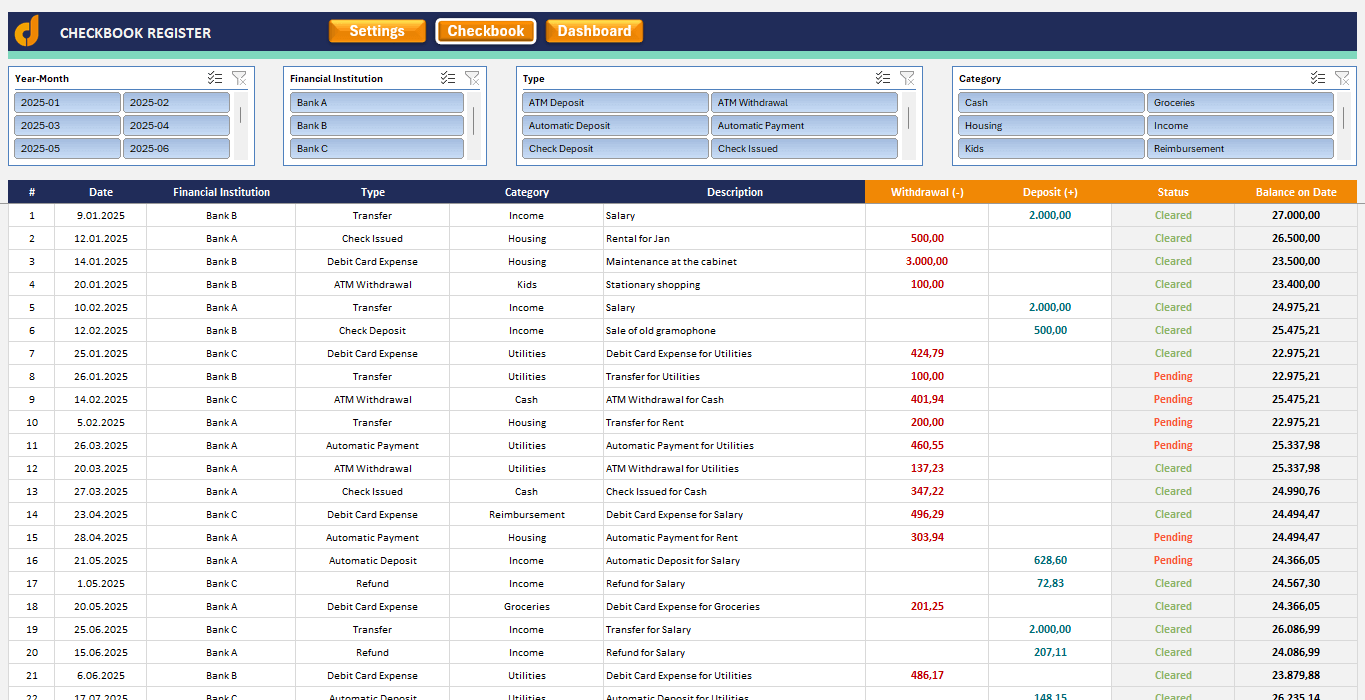
In the first row, create headers for your register columns:
A1: Date
B1: Check Number
C1: Transaction Description
D1: Payment/Withdrawal (-)
E1: Deposit/Credit (+)
F1: Balance
Format the headers by:
- Making them bold
- Adding a background color
- Centering the text
Step 2: Format Your Columns Properly
Proper formatting makes your register easier to read and use:
- Date column: Select column A and set the format to Date (select your preferred date format)
- Currency columns: Select columns D, E, and F and set the format to Currency
- Column width: Adjust each column width to properly display the data:
- Date: About 12 characters wide
- Check Number: About 10 characters
- Description: 25-30 characters
- Payment, Deposit, and Balance columns: 15 characters each
Step 3: Set Up the Balance Formula
The most important part of your checkbook register is the balance formula:
Enter your current checking account balance in cell F2
In cell F3, enter this formula: =F2-D3+E3
This formula takes the previous balance (F2), subtracts any payment (D3), and adds any deposit (E3)
Click on cell F3 and drag the fill handle down for as many rows as you want in your register
The formula will adjust automatically for each row.
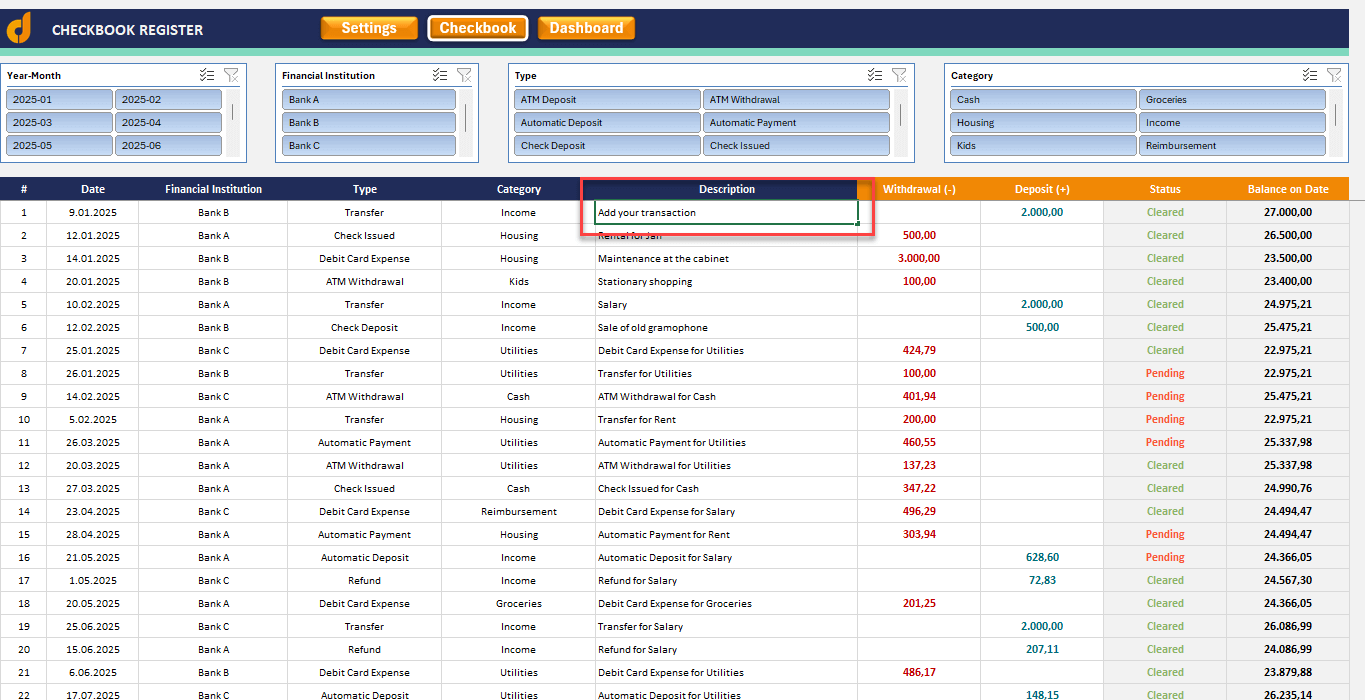
Step 4: Add Transaction Data
Now you’re ready to start recording your transactions:
- Enter the date of each transaction
- If applicable, enter the check number
- Enter a description (payee name or deposit source)
- For withdrawals or payments, enter the amount in column Withdrawal (leave Deposit column blank)
- For deposits or credits, enter the amount in column Deposit (leave Withdrawal blank)
- The balance in column F will update automatically.
Enhancing Your Excel Checkbook Register
Once you have the basic register working, you can add these helpful features:
Add Transaction Categories
Categories help you track your spending patterns:
- Add a new column G and title it “Category”
- Create a dropdown list of categories:
- Select the range where you’ll enter categories
- Go to Data > Data Validation
- Select “List” and enter categories like: Housing, Food, Transportation, Entertainment, Utilities, Income, etc.
- Click OK
Now you can select a category for each transaction from a dropdown menu.
Add Conditional Formatting
You can highlight important information with conditional formatting:
- Select the Balance column (F)
- Go to Home > Conditional Formatting > Highlight Cell Rules > Less Than
- Enter 0 and select a red fill with dark red text
- This will highlight negative balances in red
You can also:
- Highlight upcoming bill due dates
- Color-code different types of transactions
- Mark cleared transactions with a different background color
Create a Monthly Summary
Add a summary section to track monthly totals:
Create a new section below or in a new worksheet
Make columns for each spending category
Use the SUMIF function to total transactions by category:
Add a Reconciliation Section
Help reconcile your account with your bank statement:
Create a section with these fields:
- Bank Statement Balance
- Outstanding Deposits (not shown on statement)
- Outstanding Checks/Payments (not shown on statement)
- Calculated Balance (should match your register)
Advanced Excel Checkbook Register Features
Ready to take your register to the next level? Try these advanced features:
Create a Dashboard with Charts
You can visualize your spending with charts:
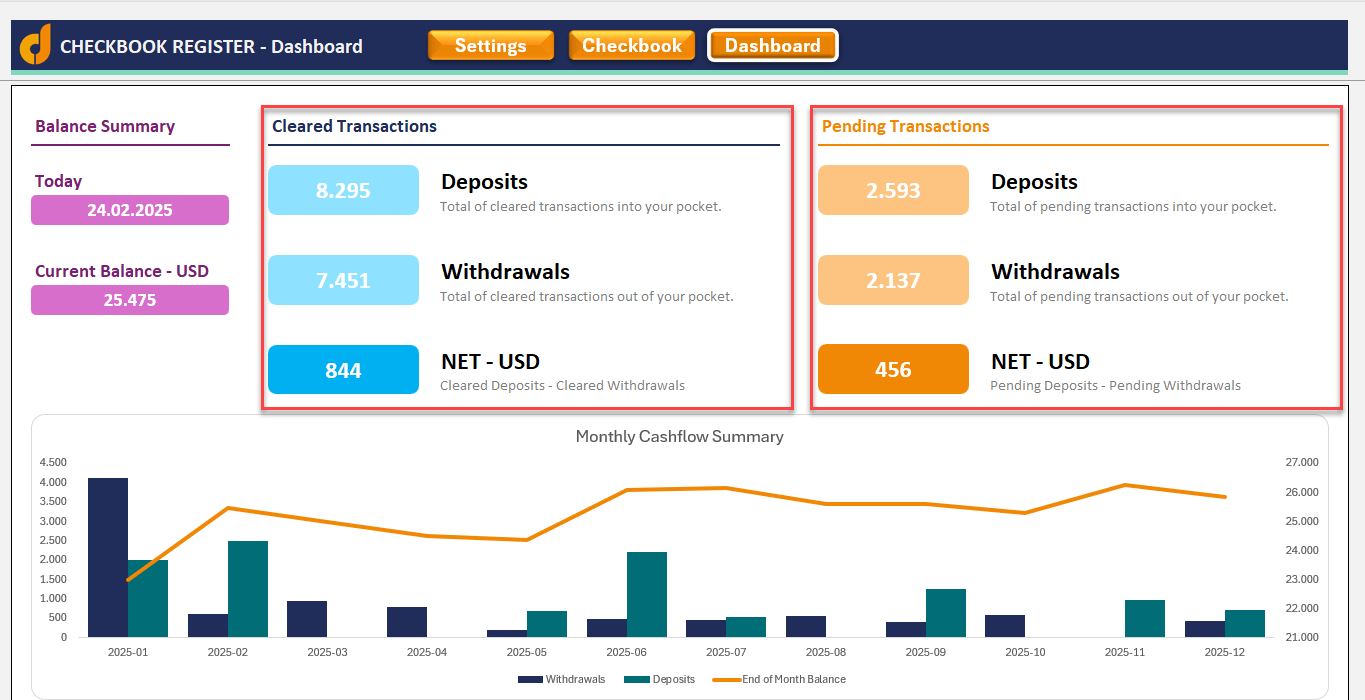
- Create a new worksheet labeled “Dashboard”
- Insert a pie chart showing spending by category
- Add a line chart tracking your balance over time
- Include a bar chart comparing monthly income vs. expenses
Use Data Filters
You can make it easier to find specific transactions:
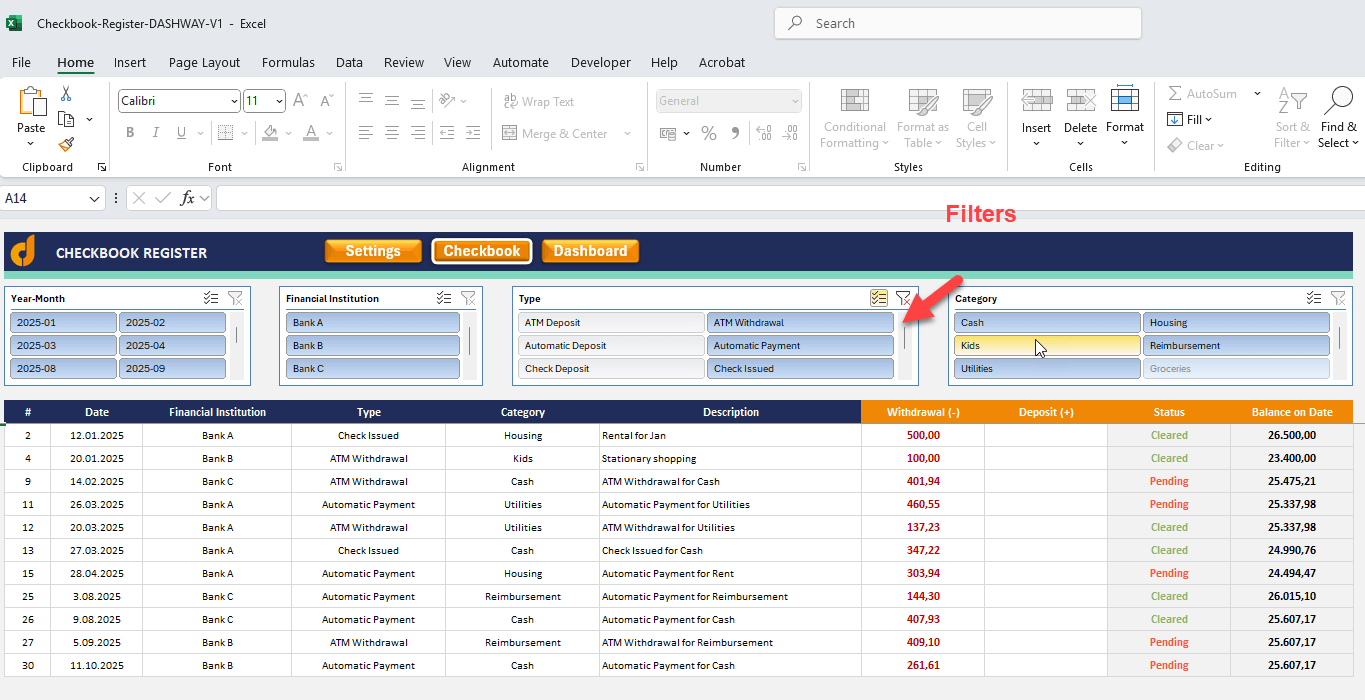
Select all your data including headers > Go to Data > Filter
Now you can filter by date ranges, transaction types, or amounts.
Automate with Macros
Lastly, you can save time with simple automation:
- Create a macro to sort transactions by date
- Add a button to quickly add a new transaction
- Create a macro to generate monthly reports
Use a pre-built template: Excel has checkbook register templates available
You can directly download a free Excel checkbook template and customize it according to your needs.
>> Dashway CheckBook Register Template in Excel
Tips for Maintaining Your Excel Checkbook Register
To keep your register accurate and useful:
- Update regularly: Enter new transactions at least weekly
- Back up your file: Save copies to the cloud or an external drive
- Reconcile monthly: Compare with your bank statement to catch errors
- Add notes: Use comments to add details about unusual transactions
- Clean up periodically: Archive old transactions to keep your file size manageable
Common Mistakes to Avoid
Watch out for these common pitfalls:
- Forgetting to enter transactions: Missing even small purchases can throw off your balance
- Calculation errors: Double-check your formulas, especially after inserting new rows
- Inconsistent categorization: Use the same categories consistently for better reporting
- Not reconciling: Regular reconciliation with your bank statements catches errors
- Overcomplicating: Start simple and add features as you need them
Summary
Creating an Excel checkbook register is a simple yet powerful way to take control of your finances. It combines the flexibility of a spreadsheet with the specific functionality you need to track your checking account activity.
By following the steps in this guide, you’ll create a personalized system that helps you avoid overdrafts, spot financial patterns, and make better money decisions. The time investment to set it up is minimal compared to the long-term benefits of having a clear, accurate picture of your finances.
Ready to get started? Open Excel, follow these steps, and you’ll have a functional checkbook register in less than 30 minutes.
Your future financial self will thank you for the organization and clarity this simple tool provides.
Remember, the best financial system is one that you’ll actually use consistently. Start with a basic register and add features as you become comfortable with the process. Happy tracking!
